
How Do I Mill My Own Flour at Home?
So you bought wheat berries.
Congratulations.
Now you’re standing there looking at a bag of what appears to be birdseed and wondering how in the world this becomes bread.
Good news: this part is actually easier than people make it sound.
You do not need a barn. You do not need a stone wheel the size of your truck tire. You do not need a degree in agricultural engineering.
You need wheat berries, a grain mill, and somewhere for the flour to land. That’s it.
A grain mill does exactly what the name says it does. It takes the whole wheat berry and breaks it down into flour. Bran, germ, endosperm... all of it goes through together unless you decide to sift some of it afterward.
And this is where fresh-milled flour starts separating itself from the bag sitting on the grocery-store shelf.
You are not just grinding “flour.” You are grinding the whole grain.
The bran is still there. The germ is still there. The oils are still there. Everything that came in that wheat berry is now sitting in your bowl.
That matters later, because that flour is going to behave differently once water hits it. But before we get into what it does in dough, we have to get it out of the mill first.
Impact Mill or Stone Mill?
There are two common types of home grain mills you’re going to run into: impact mills and stone mills.
An impact mill uses fast-moving metal parts to pulverize the grain into flour. These mills tend to make very fine flour very quickly, and they are usually loud enough to let the entire house know you have decided to bake.
A stone mill crushes the grain between stones. Depending on the mill, you can usually adjust the fineness and get everything from coarse meal to very fine flour.
Neither one is automatically “better.”
They are different tools.
An impact mill usually gives you a very fine flour right out of the gate. A stone mill gives you more control over texture.
And texture matters, because finer flour generally takes up water faster than coarser flour.
That does not mean you need to stand there with a microscope inspecting every particle. It means you need to understand that “fresh-milled flour” is not one universal texture.
Two people can mill the same wheat and still end up with flour that hydrates differently because one mill produced a finer grind than the other.
Welcome to fresh-milled flour.
How Fine Should I Mill It?
For bread, I want flour fairly fine.
Not gritty. Not sandy. Not something that looks like somebody dumped cornmeal into your bread flour.
Fine.
If you rub it between your fingers, it should feel like flour with just enough texture to remind you that the whole grain is still there.
For biscuits, muffins, cookies, crackers, pancakes, and quick breads, you still want it fairly fine, but you have a little more wiggle room because you are not asking that flour to build the same kind of gluten structure you need in bread.
People sometimes make things harder than they have to be.
One click. Two clicks. Half a turn. Three dots past whatever somebody on the internet said.
Please stop.
Your mill is not their mill. Their wheat is not your wheat. Their flour is not sitting in your kitchen.
Use somebody else’s setting as a starting point if you need one, then look at the flour in front of you.
If it feels too coarse, mill finer. If it is coming out powder-fine and behaving beautifully, leave it alone.
The flour gets the final vote.
Do I Need to Sift Fresh-Milled Flour?
No.
You can, but you do not have to.
When you sift fresh-milled flour, you are removing some of the larger bran and germ particles depending on the mesh you use. That can make the flour behave a little more like refined flour because you are physically removing some of the pieces that interfere with gluten structure.
But understand what you are doing.
You are changing the flour.
You are not “fixing” it.
There is nothing wrong with whole fresh-milled flour, and there is nothing wrong with sifting some of it if the bake you are trying to create benefits from it.
Sometimes I want every bit of the grain.
Sometimes I want a little less bran getting in the way.
The kitchen police have not shown up yet.
How Much Wheat Do I Need?
This is another area people like to make things sound harder than they are.
If your recipe calls for 500 grams of flour, start with roughly 500 grams of wheat berries.
The weight does not magically disappear because you milled it.
You may lose a tiny amount to flour dust or what stays inside the mill, but for normal home baking, the weight of the berries is basically the weight of the flour you are going to get.
It’s one of the reasons I love weighing ingredients.
If I need 500 grams of flour, I weigh 500 grams of wheat.
Done.
No measuring cups. No spoon-and-level drama. No wondering how tightly somebody packed the flour.
The scale does not care.
Does Freshly Milled Flour Need to Cool?
Sometimes.
Depending on your mill, the flour can come out warm. Warm is not automatically bad, but if it is noticeably hot, especially if you are making yeast bread, let it sit for a bit before you start mixing.
Why?
Because dough temperature matters.
If you start with warm flour, then add warm water, then add yeast, you may accidentally speed fermentation more than you intended. That does not mean fresh flour needs to sit around for hours staring out the window reflecting on life before you use it.
If it feels hot, let it cool. If it feels fine, bake. This does not need to become a ceremony.
How Soon Should I Use Fresh-Milled Flour?
As soon as you want to.
Once the grain is milled, the oils in the germ are exposed to oxygen and the flour begins changing.
That doesn’t mean it turns into garbage at midnight like Cinderella’s carriage.
But if the whole point is to use the grain fresh, then use it fresh whenever possible.
Mill what you need. Bake with it.
If you want to mill extra, go for it. Just store it airtight, away from heat, and out of direct sunlight.
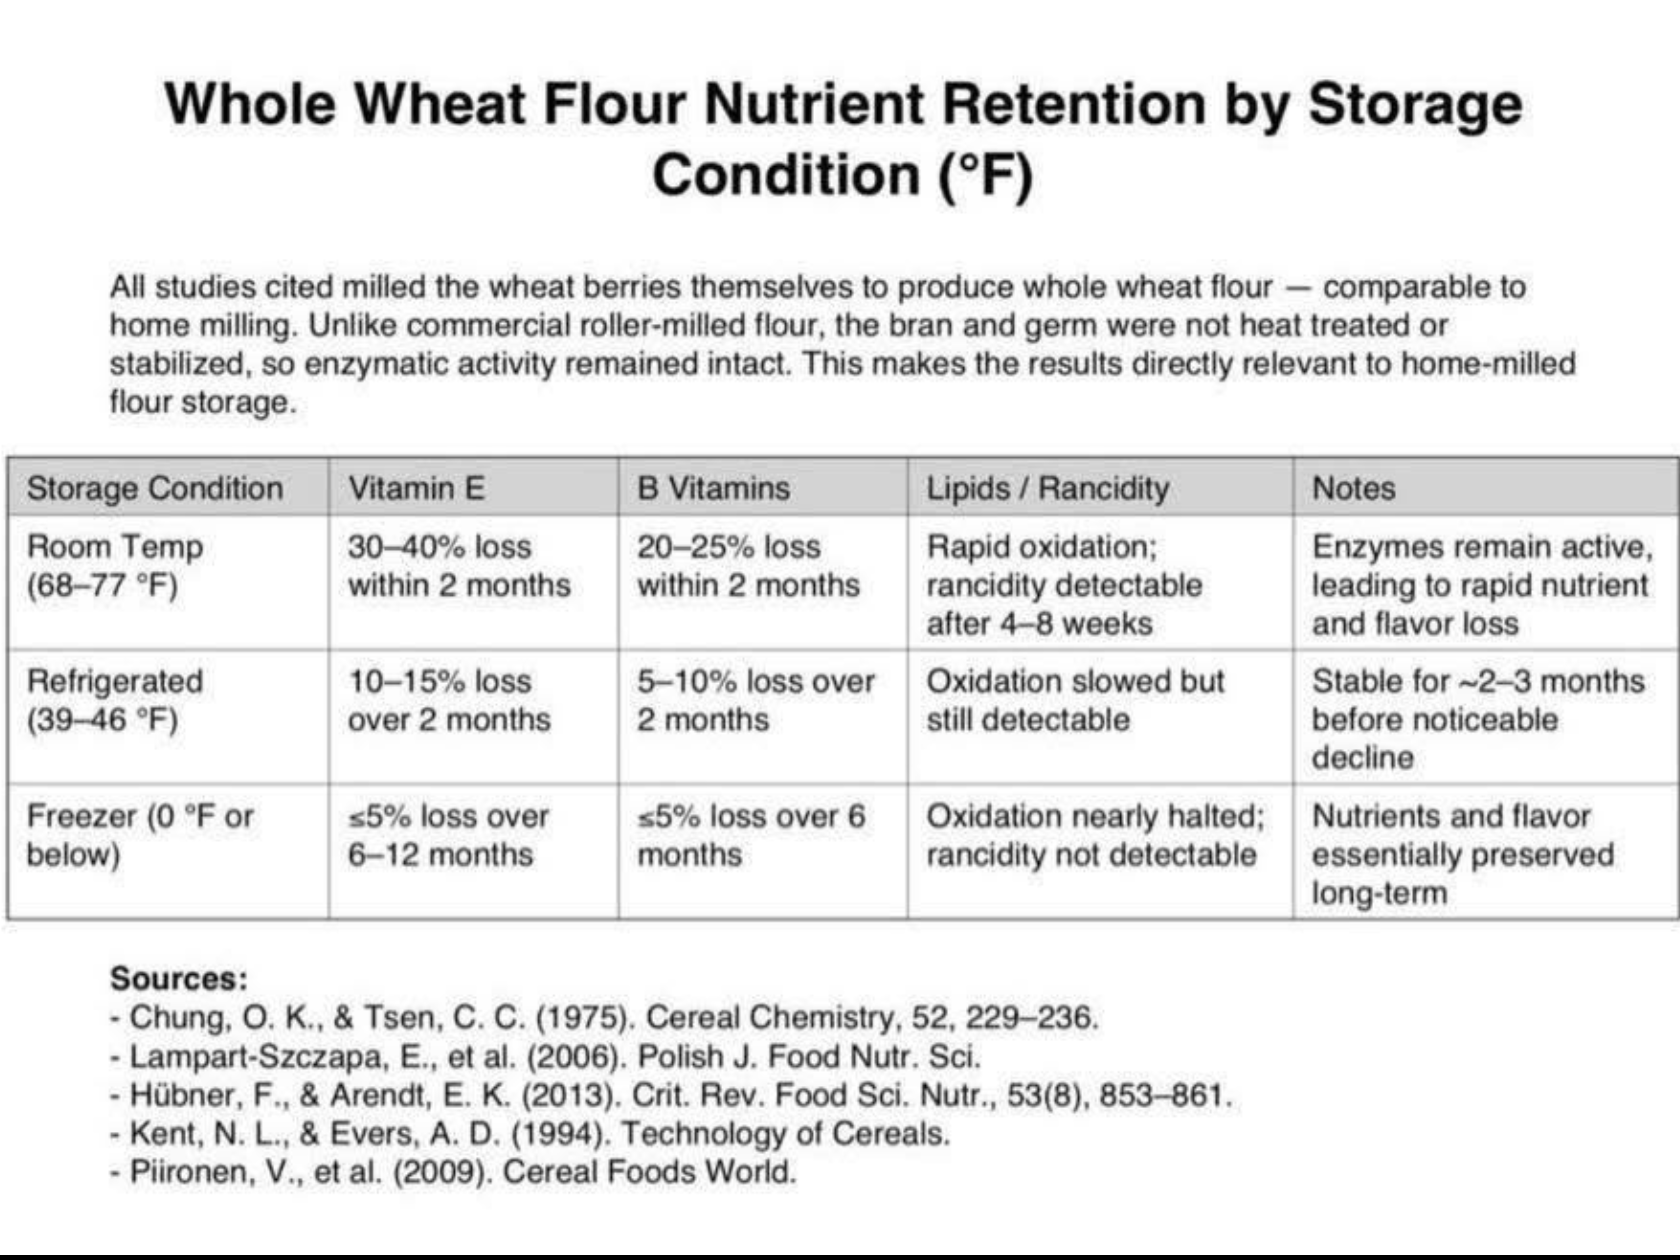
The easiest system is what is easiest for you. You’re gonna hear people SCREAM that it MUST be used right out of the mill or it loses all nutrients. That’s simply not true. In fact, check out this chart that shows nutrient loss done by some very reliable resources over many years. To calculate the percentage for the time you want to keep it, just divide what it says by the number of days in that time, and then multiply it by the number of days you’ll store it.
Example…
2 weeks… divide 2 months by 60, then multiply it by 14. That will give you your percentage of nutrient loss… but understand something… the reason you don’t see fiber, and most minerals… is because they simply don’t just vanish because you decided not to bake for a couple days.
What Should Fresh Flour Look and Feel Like?
That depends on the wheat and the grind.
Hard white wheat is not going to look exactly like soft white wheat. Hard red wheat is usually darker and stronger flavored. Durum has its own color and personality.
Some flours look creamier. Some look more golden. Some have visible flecks of bran.
What I care about more is texture.
If you are milling for bread, I want flour fine enough to hydrate well and build dough structure. If it feels gritty between your fingers, its not ruined, I promise.. It means you may need a finer setting depending on what you are making.
And yes, your flour may smell different from store-bought flour.
Fresh grain has an aroma.
Some wheat smells sweet. Some smells grassy. Some smells nutty. It is one of the first things people notice when they start milling.
Suddenly flour smells like something.
Imagine that.
What Nobody Tells You the First Time You Mill Flour
The mill may be loud.
Very loud.
The first time you turn on an impact mill, there is a good chance you are going to wonder whether you accidentally started a shop vac.
There will be flour dust. Not enough to require a hazmat suit, but enough that you learn very quickly where you want to place the mill in your kitchen.
The flour may come out warmer than you expected. It’s normal.
The amount of time it takes to mill your flour is probably going to be much shorter than you imagined.
You may spend more time finding the wheat berries than actually milling them.
And once you start using freshly milled flour, you are going to notice things you never paid attention to before: texture, smell, color, how quickly the flour absorbs water, how differently one wheat behaves from another.
You are going to start realizing that flour was never just flour.
Commercial flour just made it easy to forget that.
Common First-Time Mistakes
The first mistake is milling too coarse because you are afraid to tighten the mill.
If you are making bread, coarse flour can make dough development harder and can leave you wondering why your loaf feels heavy.
The second mistake is assuming every wheat berry can be used the same way.
Hard wheat and soft wheat are not interchangeable in every bake. One is better suited for bread structure. One is better suited for tender baked goods.
We will get into that separately because THAT deserves its own conversation. 😆
The third mistake is thinking you need to change everything at once.
You do not. In fact I’m begging you NOT TO.
Do not buy six kinds of wheat, three sifters, two mills, a proofing box, a Danish dough whisk, a bench knife, and a new personality before you bake your first loaf.
Pick one wheat. Learn it. Bake with it. Pay attention.
Then branch out.
Fresh-Milled Flour Does Not Need to Be Complicated
Something I wish somebody would tell every beginner before they start.
Milling your own flour is not the hard part.
Learning what that flour does once water hits it is where the real learning begins.
But the mill itself? Wheat goes in. Flour comes out. You choose how fine you want it. You decide whether you want to sift. You bake.
That is the whole doorway.
Everything else comes after.
And yes... your first bag of wheat berries may look suspiciously like birdseed.
Ignore that.
We have bread to make.